Wednesday, May 8, 2013

The Best Lentil Salad, Ever


Sarah B over at My New Roots has done it again. This really is the best lentil salad, ever. There are so many flavors going on with the lentils, the key is to keep everything else super simple. I mixed the legumes with some fresh dandelion greens and topped it off with some sauerkraut. 

Wednesday, April 24, 2013

COLD- I WILL FIGHTCHU!


I WON'T GET SICK! I WON'T GET SICK!I WON'T GET SICK! I WON'T GET SICK! I WON'T GET SICK! I WON'T GET SICK! I WON'T GET SICK! I WON'T GET SICK! I WON'T GET SICK! I WON'T GET SICK! I WON'T GET SICK! I WON'T GET SICK! I WON'T GET SICK!

Brought this with me to work today...alternating between raw honey and chopped ginger.    

Wednesday, April 10, 2013

A Taste of India


 Projecting dreams of future travels...


Thursday, March 28, 2013

Travel Journal: Israel

They say that it takes a few days to get acclimated back to "real life" and to absorb everything we saw/heard/felt/tasted/climbed/experienced on the trip. Well, its been 4 days and I can still barely piece together the various fragments that make up the whole ten days. One aspect that really stands out is the people I met. While I may not see many of these people I spent every waking moment with (which was a lot, we like, barely got to sleep) I realized that there are no boundaries for the kinds of relationships I will form in life. Friendships can form on various levels and connections can be made between even VERY seemingly different people. I now have doctor, lawyer and hedge-fund friends! That's nuts! The experience really brought clarity to my own sense of self and made me realize that our "outer identities" (our jobs, where we live etc. etc.) don't really make us who we are- we are such individualized beings and true relationships are built on a much deeper level. 

Ok, enough of the real talk and onto the food and pictures, this is a food blog after all!
All of the food throughout the trip was far beyond as delicious as I could have imagined. The meals were fresh, simple and mostly inherently vegetarian (as many places kept kosher). The vegetables were the freshest ever! I ate some of the best cucumbers and tomatoes I've ever had in my whole life because everything in the country is local and organic with no fancy labels or certifications needed, that's just the way it is! All of the "emergency snacks" I packed were not necessary although we did hike 80million miles a day in the sweltering heat and spend the rest of the time on a bus, so they were definitely put to good use. Two meals of note, probably because they were the only instances I went off from the group to eat, were in Jerusalem. 


The first place was called Village Green a vegetarian/ vegan take out place located in the center of Jaffa. It was a causal salad bar situation that charged by weight so you could mix and match food. The gluten free and vegan chocolate mouse cake still stands out to me. 

Our second day in Jerusalem they gave us some free time to wander around the market to get lunch. Initially, my friend and I ran to Village Green since it was so good, but sadly it is closed on Shabbat. We literally stumbled into this adorable little place, such a lucky accident!


The place was teeny tiny. There was some seating upstairs, but we opted for a table outdoor, literally on the street of the market place. Great people watching. 

We started off with some sage mint tea (new obsession) and this bottomless salad that we couldn't even finish between the two of us. It was super simple, but as I mentioned earlier all the vegetables were the freshest ever!


Then we ended the meal with some tomatoey brown rice with spiced lentil burger patties. For dessert, we bought an assortment of halva from one of the stands in the market. No words or pictures can suffice how freaking beautiful this country is, but I'll shut up now and give you some glimpses of what I saw...


Wednesday, March 13, 2013

Healthy Travels: Israel

This blog, Trail of Kale originally began as a platform to record my vegan eats while studying abroad in Ghana in the fall of 2010. You may be able to infer by the lack of posts from that time, internet was not the only thing that was sparse in that country. Grumbly stomachs aside, I learned a lot from my travels- how to prepare and how to improvise when you are completely unprepared in a foreign place. Although I've heard nothing but wonderful things about the food situation in Israel (i.e salad for breakfast!) I'm leaning towards over-preparation. Between long plane rides, hiking and generally eating in a group of 40+ people, in the worst case scenario I'll make a new friend over some dark chocolate?


L-R: 2 bars of dark chocolate (don't want to worry about hidden milk derivatives in a foreign language) various types of raw trail mixes for hikes, various food-based protein bars (Pure bars have a simple ingredient list and Macrobars are my new found on the go obsession! the coconut granola one tastes like candy!) Yogi Tea bags for morning and evening and some stomach ease thrown in there, nut butter packets and an sleepy eye mask because the best way to fight jet-lag is sleep. 

L'hitraot! (see you soon)

Sunday, March 10, 2013

Yogi Lunch #3

Another wonderful weekend of yoga training! Here's what I ate:


Saturday: Leftover Tandoori cauliflower, coriander quinoa and some sauerkraut 

I really could eat that cauliflower everyday for the rest of my life and not get sick of it. 


Sunday: Ruby roasted veggies (onion, fennel, beets and sweet potato) coriander quinoa, sauerkraut, a gala apple and VERY dark chocolate

This mix of roasted veggies is quickly becoming a staple in my kitchen this winter. Both meals were wholesome, filling and really easy to make in big batches ahead of time.  

Thursday, March 7, 2013

Whole Roasted Cauliflower with Coriander Quinoa

I'm often asked "don't you get sick of eating vegetables all the time?!" Absolutely not! I am constantly discovering new ways to approach vegetables that I don't think I'll ever get sick of them. I've been on a roasted vegetable kick during these cold months and when I stumbled across this recipe for Whole Roasted Tandoori Cauliflower from my favorite blogging goddess, I knew I had to give it a try. On her post, Sarah goes into depth about the goodness of each spice. I created my own mix of similar spices, but it was nice to read about the benefits of each. Instead of yogurt, I used Coconut Kefir which allowed the spices to form into a thick marinade which coated the cauliflower. I let it sit overnight before roasting the whole thing. When it came out of the oven, I sliced it like a cake! 


 While I totally could have eaten the entire head of cauliflower and called it a day (or a dinner) I knew that I would want some whole grains to accompany it. Enter: coriander quinoa. In a pan, simply toast some coriander seeds (partially crushed either in a morder and pestle or with the back of a spoon). Add the quinoa to the pot and toast until it turns light brown. Add mung beans, any remaining spices (I used the leftover blend from the cauliflower) and water and bring to a boil, then simmer for 15-20 minutes. Turn off the heat, add a pinch of salt, fluff with a fork, cover the pot and let it sit for 5 additional minutes. 

Monday, March 4, 2013

Every Day I'm Trufflling...

So, while reviewing my cart on the check-out line at Whole Foods, I picked up one of the few packaged items among the heaps of cruciferous and root veggies. It was one of may favorite treats, the 88% dark (not for amateurs!) chocolate bar by Endangered Species. It really is lovely bar/ company; all sustainably sourced ingredients, they donate 10% of net profits to wildlife preservation, not to mention (and most importantly) delicious. However, in my effort to save packaging/money/the world, I shifted my gaze to the bag of figs in my cart and remembered the huge bag of raw cacao powder in my fridge at home. And the rest is history...no, really, these truffles won't last very long!

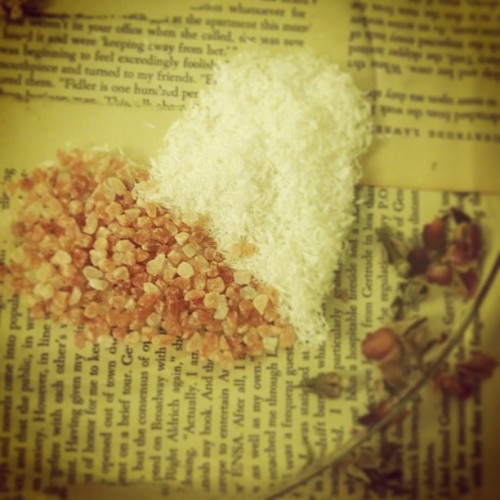
Pink salt, coconut flakes, rose petals and love

Ingredients: (makes 14 truffles) 
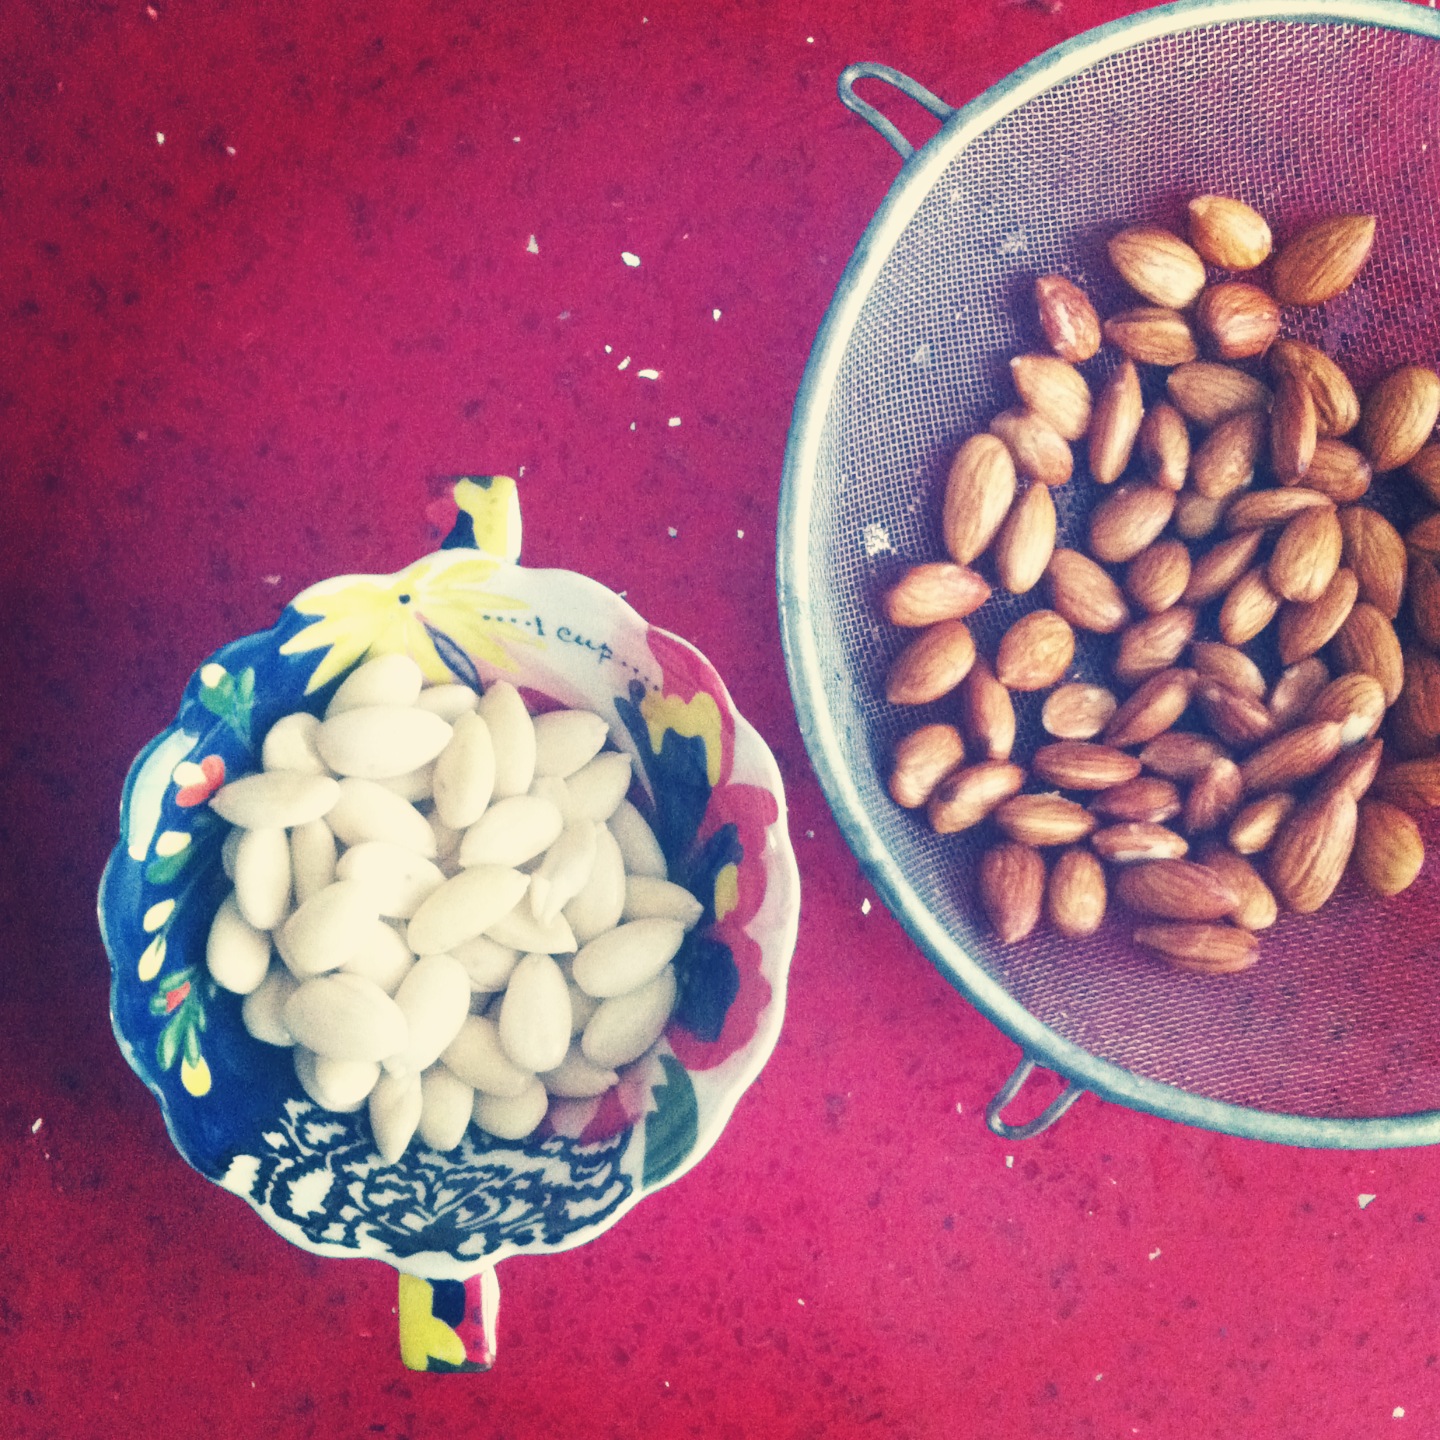
1 cup almond meal (alternatively, put whole almonds in a food processor and pulse until it reaches a flour-like consistency. You can also use another kind of nut or seeds such as sunflower to make them nut-free)
2/3 cup dried fid
4 generous tablespoons raw cacao powder (I purchased a two-pack of Navitas Naturals and put one in the freezer and keep one in my fridge. It's a bit of an investment at first, but it will last...or not if I keep making truffles :)
1/4 teaspoon vanilla extract
1/4 cup water (preferably filtered)

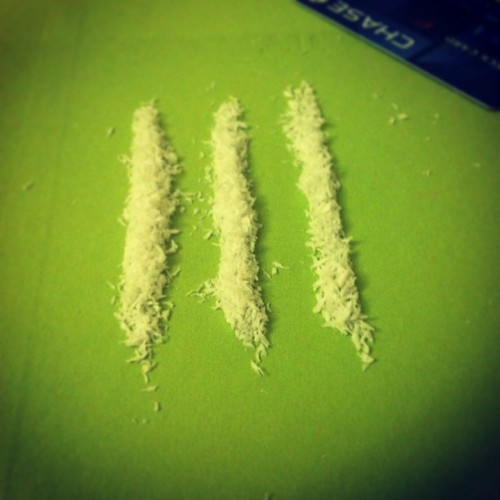
I'm an addict. A coconut addict, that is!

Toppings:
The options are really endless as this almond/fig combo creates a very versatile base. Here are the two versions I made, by feel free to play around!
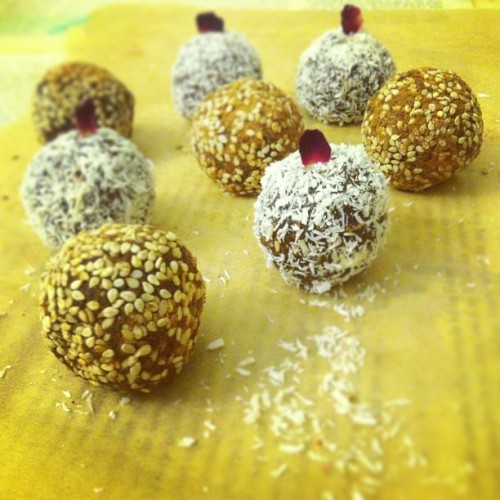
Version #1: Cinna-Sesame (sesame seeds, ground cinnamon, pinch of cayenne pepper, pinch of ground ginger)

Version #2: Salted-Coconut (dried coconut flake with course pink Himalayan sea salt mixed in) I also stuck a little dried rose petal on top, just to make them extra fancy

Other ideas: bee pollen, dried lavender or other herbs, goji berries, cacao nibs...

These taste as good as they look

Combine the almond meal, figs, cacao powder and vanilla extract in the base of a food processor.Process on high as you slowly stream the water into the running processor. It should form a sticky dough pretty quickly, but you may need to stop the machine and scrape down the sides. Using a measuring spoon, scoop out 1 TBS of the dough and roll it between your palms into a nice ball. Repeat until no dough remains. You should be able to make 14 truffles, though it will depend on the size of your balls (and also how much dough you use for each truffle. haha!) Get all your topping ingredients ready on a big plate. Have a small bowl of warm water handy to dip each truffle in before rolling the topping of choice to help it stick. I also found that coating my hands in coconut oil first prevented the dough from sticking, while simultaneously moisturizing my hands! These can be enjoyed immediately or stored in the freezer for later. 

Thursday, February 28, 2013

Breakfast, I still love you!

Since starting an intensive yoga teacher training program, I've noticed lots of changes in my eating habits. Not only has my appetite changed considerably (either completely diminished or insatiable) but the size and timing of my meals are totally different than they were before the training, and continue to vary depending on the time of day that I practice. The biggest change for me is breakfast. In the past, my day did not begin until breakfast ended. Breakfast has been my signal for my body and brain to start working, my fuel to get going and the first thing I create. Since I started practicing yoga more intensely most mornings, I've had to forgo this ritualistic meal. Not only was there no time to prepare and consume food before leaving the house at 8 or 9 am (give me a break, I've only been out of college for six months!) but it is actually not a good idea to practice on a full stomach.

Why should you do yoga on an empty stomach? Just try to visualized food moving down the digestive track while attempting twists and inversions for a moment. Its like driving off the road and going backwards and in circles before proceeding to your destination. It takes a lot of energy to digest food-moving food through the system and assimilating nutrients. Moving through various poses and transitions take lots of energy too, and thusly compromises your body's capacity to absorb nutrients and depletes the amount of energy you have to expend on asanas. Kind of a loose-loose situation, if you ask me. Having an empty belly also allows for deeper breathing (literally more room for air) and a clearer mind. If you don't practice yoga in the morning, or MUST eat something when you wake up, make sure you allow one to two hours (depending on the speed of your metabolism) to digest before practicing. 

All that said, there have been few days where I opted to attend a class in the evening and started my day with a gentle self-practice and meditation, followed by a nourishing breakfast. Below are some culinary creations I have been enjoying lately: 


A sweet and grounding breakfast porridge comprised of:
1/2 cup brown rice
1 carrot, grated 
1/4 cup raisins
1 T sesame seeds
maple syrup (to taste) 


 A blueberry buckwheat pancake, based on this recipe 


A green smoothie with raw cacao and this life-changing G-F bread via My New Roots

Sunday, February 24, 2013

Yogi Lunch #2

Second week of training complete! Friday night we got a nice (and hilarious) overview of the history of yoga. Saturday and Sunday asana practice focused on standing poses with neutral pelvis followed but seminars on Ujaii breath & meditation and anatomy of foot to the pelvis, respectively. Here is what I ate:


Saturday: Steamed bok choi rubbed with an ume plum and a sweet potato roasted with black beans, a few squares of dark chocolate (not pictured)

Very balanced meal. I'm kinda on a sweet potato kick these days and the black beans mixed in create a nice carb/ protein combo. 

Sunday: Kitchari in a jar(y)! This version included: quinoa, mung beans, carrot, onion, celery, daikon and kale.

After talking tons about Ayurveda in training and the wonders of Kitchari, I thought this would be a great lunch, easily transported in a old honey jar. Because everything is cooked together, it makes for easy digestion and assimilation of nutrients. Win!

Sunday, February 17, 2013

New Series: Yogi Lunch #1

As I mentioned, I've started my yoga teacher training. Of course, one of the first questions that came to mind during our Friday night orientation is what am I going to eat for lunch during our 9 hour training days? As the intern, one of my duties is to arrive at 8:30 am (yikes!) to open the studio before everyone else arrive for the Saturday and Sunday intensive training days. We begin with 3 hours of asana (or physical) practice each day, then break for lunch and then have a couple of hours of seminar (this week we covered the lifestyle of a yogi with an introduction to Ayurveda and developing a home practice) and finally end with more asana practice. As much as  I love breakfast, I can't really stomach any food that close to waking and definitely prefer practicing yoga on an empty stomach. That means breakfast on training days will consist of warm water with lemon and perhaps a spoonful of bee pollen or a piece of fruit if I feel I need a little something. That means lunch needs to be my main fuel-up for the day. It is actually preferable to make lunch your biggest meal of the day, as that is when digestion is strongest. I began to brainstorm some credentials for my new mid-day meal:
-transportable
-cooked, yet enjoyable at room-temperature
-healthy (duh)
-delicious (duh)
-filling enough to satisfy me until dinner at least 6 hours later, yet easily digested so I can comfortably do yoga a few hours after consumption
-uses seasonal ingredients 
-simple enough to prep the night before

Here is what lunch looked like my first weekend of training::

Saturday: 1/2 cup brown rice, home-make ruby sauerkraut and hijiki-brocoli stir fry with chickpeas and sesame seeds

This was a lot of food for me! I forgot how doing lots of yoga can make you loose your appetite initially. I managed to scarf most of it down though because I woke up at 7am, rode my bike to the studio and then did 3 hours of intense asana practice on an empty stomach and knew my body needed it. I was happy I had this to refuel with, but during our break between seminars I wish a had brought a little snack or something. I tried to buy and orange from this fruit store near by, but it looked kind of shady, so I passed and waited until dinner. 


Sunday: Steamed sweet potato with dulse seaweed and sesame seeds, lightly steamed kale and two apples and tea for snacks.

This lunch was perfectly simple, a good combo of carbs and protein with greens to rejuvenate. Tea bags are also key- we have a hot water dispenser at the studio so it was nice to have something warm to sip on when sitting still during the seminars. 

Stay tuned for more yogi lunches!

P.S. These are great lunches not only if you are rolling around on a mat for hours, but if you need something that fits in a bag to bring to class/ the office/ out on appointments with you. Hope they inspire some creative mid-day munching!


Thursday, February 14, 2013

Happy Love Day

Hope your day is full of lots of (self)lovin' and good food!
xKim

Sunday, February 3, 2013

Winter Slaw with Creamy Tahini Dressing

This winter slaw recipe has been the perfect way to include some raw veggies amongst the many cooked versions I've been enjoying this winter. Its super quick to toss together, can be adapted to whatever vegetables are left over in your fridge and is refreshing yet hearty due to the creamy dressing. 

I love using a big box cheese grater to grate all the veggies- so quick and ensures everything is a consistent size. I grated up (counter clockwise)::
one large beet
one carrot
1/2 of a daikon radish
1/4 purple cabbage
chopped kale

The dressing consisted of::
2T tahini 
1t miso
1t mustard
4T balsamic vinegar
1/2t cumin
1t maple syrup (optional)
1/2 teaspoon sesame oil (optional)
1/4 – 1/2 tsp sea salt (to taste) 


Tossed everything together in a big salad bowl and let sit for about 20 minutes for the veggies to soften and flavors to meld together. This salad can be enjoyed immediately or refrigerated for 2 days. 


Saturday, January 26, 2013

Squash Attack

As I've developed a more intuitive eating habit over the years, it has become clear to me the importance of eating foods that are seasonal and preparing them in an appropriate manor. According to Ayurveda and my body (an even more scientifically accurate source, if you ask me) the winter months are the best time to prepare lots of root vegetables in a longer cooking process. I bring you: my squash obsession! 

Squash is low in fat and extremely high in fiber and anti-oxidenets. It is also full of potassium, folate and B6 which aids in immune system function. The bright orange color of squash indicates the an abundance of powerhouse nutrients known as carotenoids, shown to protect against heart disease. In particular, the gourd boasts very high levels of beta-carotene (which your body automatically converts to vitamin A), identified as a deterrent against breast cancer and age-related macular degeneration.* It is also thought to be anti-inflammatory due to the high anti-oxident content, which is especially vital in the cold winter months. 


Like I mentioned, I have been enjoying squash in numerous forms. The other day I bought an entire butternut squash. I cut off the hallow bottom, sliced in half, scooped out the seeds (which I later roasted) and stuffed them with marinated mushrooms and fresh rosemary. Mmm. I cubed the rest and coated in coconut oil and sea salt before  roasting in a 400 decree oven for 40 mins and placing under the broiler for 10 minutes. I have yet to meet a squash I don't love. 

In other breaking news...check out my little "urban garden" I've got going on. The tin can has celery and those are salad sprouts on the right. 


Saturday, January 19, 2013

Why I will never buy almond milk again...

...because it is so freaking CHEAP and EASY to make and TASTES so so so much better when you make it yourself (as with most things).


With just two ingredients: almonds and water, why would I pay more money for added preservatives and the packaging? Don't need those last two things. Only almonds please! Just make sure the brand of almonds you choose hasn't been fumigate with toxic gas. Yea, that's a thing...You simply start by soaking almonds for about 8 hours (I just left them in a bowl covered with water overnight) and then push the skins off. Ok, this takes a bit more planning than running to the grocery store, but it literally takes 2 minutes to scoop out some almonds and put them in a bowl. Don't get lazy on me now. Why bother soaking? It not only prevents your blender from having a (literal) melt-down, but most nuts actually need to be soak to re-activate the live enzymes within them, making their nutrients more readily available and easier to digest.


The next part of the process is to place your now naked almonds (thats what I call them with their skins off) into your blender and cover with four cups of fresh, filtered water. At this point you can also add a sweetener of choice, some sea salt or other flavoring of choice, such as a vanilla bean or cinnamon. Then press BLEND and let the machinery do all the work. Only about a minute or two. Place your nut milk bag/cheese cloth/clean panty hoes (in order of most legit to janky, but crafty) in a bowl or wide-mouthed jar and empty the contents of the blender into it, slowly. After its all in there and the foam has settled down, begin to lift the cheese cloth out, sweezing it with all your might to get every last drip of milky goodness out of there! 


But don't throw away the left over pulp, that stuff is valuable! 

Not sure exactly what to do with a lump of almond pulp? For starters, you can use it as you would almond flour, add it to oatmeal, make it into cookies or crackers...

This video by one of my all time favorite blogs, My New Roots, totally demystifies the whole process and beautifully illustrates just how simple and versatile making your own milks at home can be!